Parent Portal FAQs & How-Tos + Mobile App Guide
Need help navigating the Portal? This page will answer some of the questions we’re asked most often! Then, scroll further down to learn all about the Parent Portal Mobile App!
What is the Parent Portal/Customer Portal?
The Parent Portal/Customer Portal is a secure online portal that you can access from any smart device whenever you’d like. The Portal allows you to view your account information, enroll students in classes, view and make payments, and so much more.
How Do I Create an Account?
● Navigate to the Portal by clicking the Big Blue Button at the top of this page and select “Create an Account.”
● Fill out all of the required fields and select “Next” at the bottom of the screen. If you cannot click “Next,” review the form and make sure all required fields are completed. Double-check for any checkboxes that may need to be selected.
● Make sure to check the box to opt in to receive emails on any news updates or important information.
● After all fields are completed, click “Create Account.”
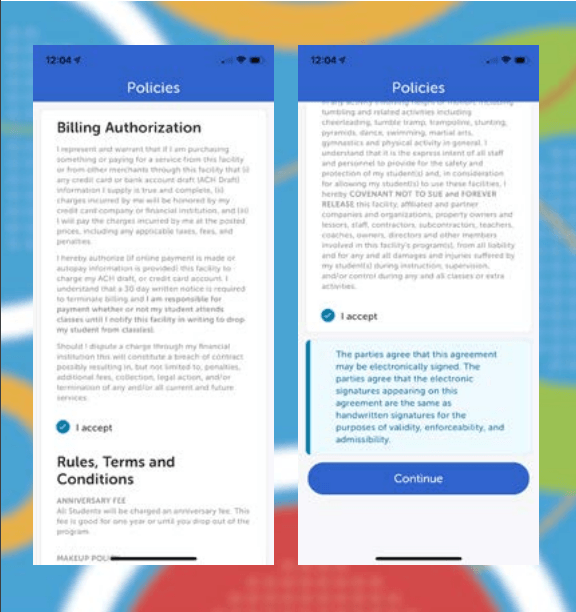
● Lastly, you will have to accept policies by clicking “I accept” below each policy. From the “Policies” page you can view, download, and print all policies.
● Once you have created an account, choose “Yes, Create a Student” to add your student or select “No thanks, return home.”
How Do I Log Into the Parent Portal?
● Go to the Portal by clicking the Big Blue Button at the top of this page. Then select “Log in”.
● You will see a screen that asks if you are a current customer. If so, select “yes” and enter your email and password.
● Finish logging in by clicking “Next” at the bottom of the screen.
I forgot my password. How do I log in?
● Go to the Portal and click “Log in.”
● Select “Forgot Password.”
● Enter the email address associated with your account and select “Submit.”
● Check your email account for the password reset email with a verification code.
● Enter the verification code in the Portal and click “Verify” to reset your password.
● Enter and confirm your new password and click “Update Password.”
Need further assistance? Don't hesitate to reach out and we'll be happy to help!
How do I create a student?
● After logging in, Click “My Account” and then click “Add Student.”
● Fill out all of the required information in the “New Student Details” form and click “Save.”
● When successfully done, you will see a screen that says your student was successfully created. Exit out of this message to be returned to your “Account” page.
● To add another student, simply click “Add Student.”
How do I enroll a student in a class?
● After logging in, Select “Booking” at the top of the page.
● To enroll in a class, click “Find a Class.” This will take you to a screen that asks if you need help finding a class. Clicking “Yes, please” will take you through a step-by-step questionnaire to find just the right class for your student. Clicking “No, just looking” will allow you to browse all classes.
● You can use filters at the top of the screen to narrow your search based on things like days and openings.
● When you have found the right class for your student, select the class and select the student that you would like to enroll. Lastly, click “Enroll Now!”
● Enter any details about your student and select “Add to Cart.”
● To complete your enrollment, click “Pay Now” and complete the checkout process.
How do I enroll a student in a camp?
● After logging in, Select “Booking” at the top of the page.
● Click on the appropriate camp type to bring up a list of available camps to choose from.
● Select the student(s) you wish to enroll and a list of camps will be shown that match the age/gender requirements for the selected student(s).
● Use filters at the top of the screen to narrow your search based on things like days and openings.
● When you have found the right camp for your student, click on the camp, and select the student(s) that you would like to enroll.
● Click “Enroll Now!”
● Select the appropriate camp block (if available) and answer any user-defined questions and select “Add to Cart.”
● Click “Complete Transaction” to complete the checkout process and finalize the enrollment.
How do I view my student's enrollments?
● Log in to the Portal.
● From the “Account” screen, find the student that you would like to view enrollments for and select “Enrollments.”
● This will show you any classes or camps that your student is enrolled in.
How do I view news and announcements?
● Log in to the Portal.
● Select the “News” page at the top of the screen. All news and announcements will be displayed here.
How do I edit my account information?
● After logging in, from the “Account” screen, select “Account Information.”
● All account information can be edited by clicking on the field, entering the information you would like to change, and clicking “Update.”
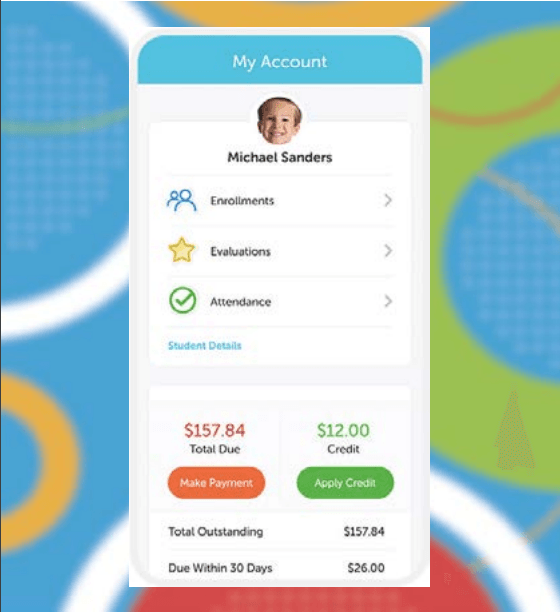
How do I make a payment?
● Log in to the Portal.
● From the “Account” screen, select “Payments.” This shows any outstanding charges and available credit.
● If you have not already done so, you will need to connect a credit card or bank account by selecting “Add Payment Info” and completing the form.
● To pay any outstanding charges with your connected credit card or bank account, select “Make Payment” and complete the form.
● To pay any outstanding charges with credit on your account, select “Apply Credit,” and complete the form.
How do I view my transaction history & print a statement?
● Log in to the Portal.
● Transaction history can be found by clicking on “Transaction History” from the top of your account page.
● To download or print a statement, select “Generate Statement.”
How do I join auto-pay/opt-in for recurring billing?
● After logging in, from the “Account” screen, select “Payments.”
● If you have not done so already, click "Enter Payment Information." Then, read the billing authorization policy and click "Confirm." It will then prompt you to enter your payment details on a secure form.
● Finally, check the checkbox labeled "Opt-In to Recurring Billing" to have your card processed automatically each month for school year class tuition and your annual membership fee payment, when applicable. To read more details about our payment procedures and for a list of all billing dates, please click here to be redirected to the Class Procedures and Pricing page on our website.
How do I change my password?
● Click on “Login/Security” at the top of the “Account” page.
● Enter and confirm your new password and click “Update Password.”
How do I log out of the Portal?
● Select “More” at the top of the page.
● Click Log Out.
Mobile App Guide

Use the iClassPro App to access the Parent Portal from your phone. The app is the easiest and most streamlined way to use the Portal from a mobile device!
- FREE for you to download and use
- Available for Apple iOS and Android users
- Quick and easy to get started
- Access our facility from anywhere, day or night
How do I download the Mobile App?
Start by locating our app for download. Go to either “Google Play” (for Android devices) or the “App Store” (for iOS devices).
Once there, search for “The iClassPro App,” download it and click “Install.” It’s that simple, and FREE! (See photo to the right for what our app icon looks like.)
You can also use the link buttons on this page to navigate directly.
Logging in for the First Time
When launching our Mobile App for the first time, you will be prompted to enter the name (code) for our organization. Our facility code is: kjsgym
Once entered, click “Submit”.
After clicking “Submit”, you will be prompted to either “Log In” or “Create an Account.” If you choose to “Log In,” please use your existing email address and password. This is the same email and password used when logging into our Customer Portal.
If you choose to “Create an Account,” then you will follow the same steps as when you established a new account through our Customer Portal (including receipt of a verification email).
Once logged in, you will be directed to your “Account Dashboard” where you may be asked to agree to our policies. You will be asked to agree to these policies if you have not done so previously.
Updating Personal Information
The “Account” section allows you to update, add, and remove basic
information about yourself. All changes made here will automatically update in our system.
From your “Account” tab in our iClassPro App, you can update personal information for yourself or your student. Simply select the detail that needs updating, correct the information, and click “Save.” It's important to us that you provide accurate contact information, in case of emergencies. We recommend having at least two phone numbers associated with your account. Additionally, make sure you are subscribed to our email blasts. We use email to alert you to our upcoming events, and also class cancellations due to inclement weather.
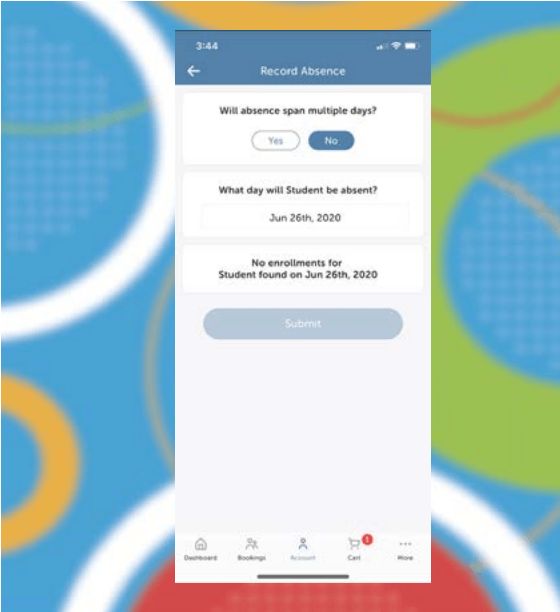
Viewing Attendance & Recording Future Absences
The iClassPro App puts your students’ attendance right at your fingertips and gives you the ability to record future absences.
To view attendance and/or record future absences, simply navigate to the “Account” tab at the bottom of your screen and select the student you would like to view. From the student, select “Attendance.”
After you alert us of your upcoming absence, we will place a make-up token on your account, which you can use to schedule a make-up class. More details about make-ups can be found below.
Booking Classes, Camps, and Parties
Quickly find and register for classes and camps, and book parties from The iClassPro App!
To explore classes or enroll your student in a class, navigate to the “Bookings” tab at the bottom of the screen. Next, you can “Find a Class,” “Find a Camp,” or “Book a Party.”
To enroll in classes and camps, select the student you want to enroll. You will now be able to see classes and camps available to your student as well as filter them by a variety of criteria. When you find the class or camp that you want to enroll your student in, select “Enroll [student’s name]” and the class will be added to your cart. You must complete the checkout process in order to complete your enrollment.
To book a party, navigate to “Bookings” and select “Party Booking.” Next, you will select the date, time slot, package, and any addons you may like. Lastly, enter party details, agree to the waiver, and select “Continue” to add it to the cart. You must complete the checkout process in order to complete your booking. For checkout questions, please see the “Checking Out” section.
Checking Out
Cart checkout using The iClassPro App is easy and must be done in order to complete any enrollments or party bookings.
To complete the checkout process, navigate to the “Cart” tab at the bottom of the screen. From there, make sure to verify the class, camp, or party information showing in the cart. Next, verify the payment method you wish to use (You can edit/add a payment method as needed). When you are ready to complete your checkout, click “Complete Transaction” which will allow the system to attempt to run a payment. You will be notified if there is an error.
Requesting Class Transfers
Sometimes schedules change and class transfers are needed so we’ve made it easy for you to request transfers using our iClassPro App.
You can request a class transfer using our app by navigating to the “Account” tab located at the bottom of the screen. Find the student that you would like to request a transfer for and select “Enrollments.” From this screen, select the class that you would like to transfer out of and select “Transfer Enrollment.”
You will now be able to view all classes available to transfer to. After you select a class, click “Submit” and your transfer request will be sent for approval.
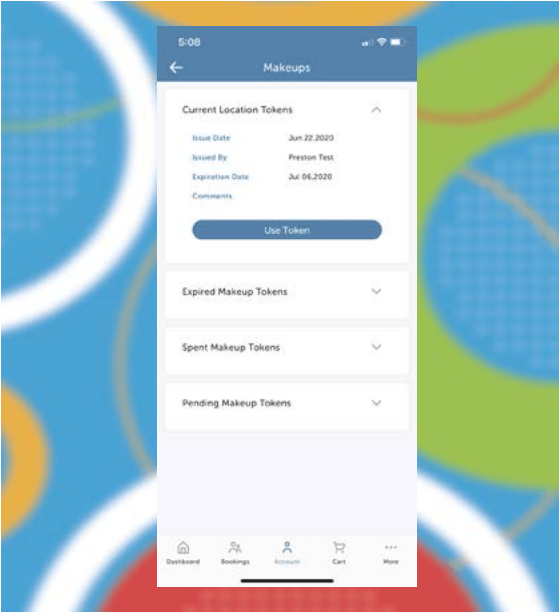
Viewing and Using Makeup Tokens
Makeup tokens are virtual tokens that you can easily view and apply to classes using our iClassPro App.
***Please note that at KJ's, we require you to actively reach out to us to receive a make-up token for any missed class date, as we must apply them manually to your account - they will not automatically be applied after a missed class. Please call or email us, or use the "Record Future Absences" feature, mentioned above, to receive a token. We will be happy to assist you in scheduling a make-up after you contact us either before or after your missed class date. Please view our page Class Procedures & Pricing page to learn more about makeup tokens and to view our full make-up class policies.***
Simply navigate to the “Account” tab located at the bottom of the screen, find the student that you would like to view makeup tokens for and then select “Makeups.” From here you can see all current tokens, expired tokens, spent tokens, and pending tokens. To apply a token, select “Use Token” and select the class you would like to apply the token to.
Go to our Parent Portal by clicking the button at the top right-hand corner of the page.